
Seasonality
Many data assets have regular behavior patterns. For example, a restaurant might have three rushes (breakfast, lunch, and dinner) that occur daily at all locations, each about an hour long. Data from one of the off-hours isn't really comparable to data from one of the rushes. Likewise, breakfast data might not normally look like dinner data. To account for these patterns, you need a way to make sure you compare the right data periods. In Lightup, this regular variation is called seasonality.
When a metric runs, if seasonality is set up it will create separate profiles for each season. So in our example restaurant, every hour of the day is a season, and the metric creates profiles for each of them. Then when you add an anomaly detection monitor, it only compares seasons to each other— comparing lunch hours to lunch hours, etc.
Note that seasonality only impacts anomaly monitors. It does not impact a metric without any monitors, and it does not impact detection of incidents on metrics that have manual threshold monitors.
To set seasonality, you'll want to think about the operation of your business and identify the seasonality selection that fits best. If you're not sure, set seasonality to No Seasonality - as you get more familiar with the system you'll be better able to identify how seasonality settings will impact incident generation. If you think that your metric does have seasonality, but you aren't sure how to represent it, you can select Auto seasonality. When a monitor is associated with a metric that has Auto seasonality, it will perform seasonality discovery during monitor training and choose the seasonality that fits best.
Set up seasonality
You set up seasonality on the Configure Metric tab of a metric.
Find the Seasonality drop down and select an option. The table below shows your choice of seasonality selections and the associated definition of the seasons.
| Seasonality | Number of seasons | Occurring every |
|---|---|---|
| No seasonality | NA | NA |
| Auto seasonality | NA | NA |
| Daily with 15 minute seasons | 96 | Day |
| Daily with 1 hour seasons | 24 | Day |
| Daily with 8 hour seasons | 3 | Day |
| Weekly with 15 minute seasons | 672 | Week |
| Weekly with 1 hour seasons | 168 | Week |
| Weekly with 8 hour seasons | 21 | Week |
| Weekly with 1 day seasons | 7 | Week |
Except for No Seasonality and Auto Seasonality, each setting for Seasonality has two parts:
- The period of time over which all seasons occur— in our example restaurant, the seasons occur daily.
- The length of seasons— the individual chunks of time that have typical behavior. For our example, the seasons are one hour long.
So for our example restaurant, we'd set Seasonality to Daily with 1 hour seasons. By doing this, each hour of the day will have its own profile, and any given hour will generate an incident only if it violates the pattern seen in that same hour during the training period.
Custom seasonality
If your data has seasonal patterns that are different from its typical seasonality— say, during summer or on New Year's Eve, you can customize your seasonality by adding one or more override periods. The basic seasonality still applies to these periods, but each gets its own profile. This lets you compare data within each override period separately, so that any monitors you add will only generate incidents by comparing these periods to each other, not to the rest of your data.
Continuing the restaurant example, you might typically have much larger crowds on New Year's Eve, and they might stay later than on a regular day. With daily one-hour seasons, a monitor might generate an incident when it shouldn't because the data from December 31st doesn't look like data from other days. To correctly assess your data, you would add a custom override for December 31st to your basic seasonality.
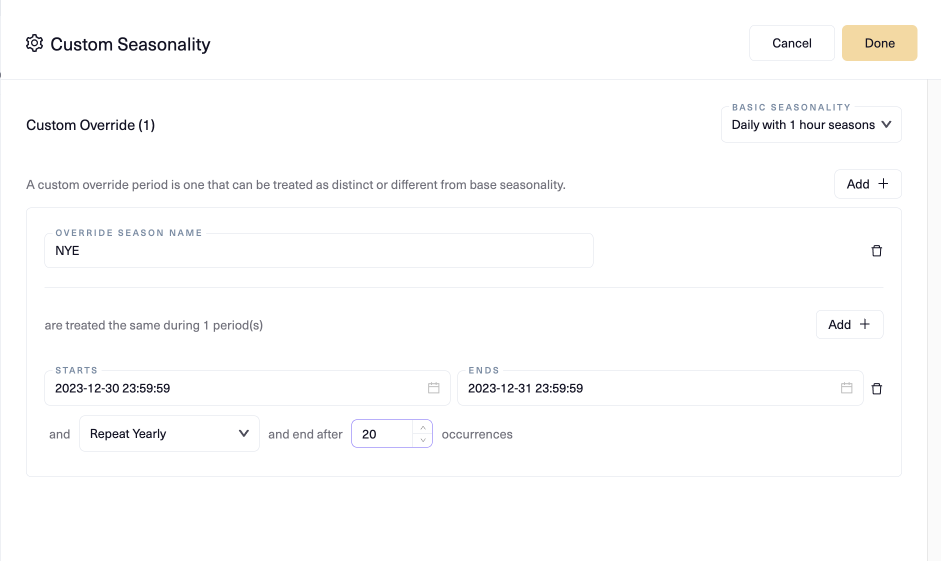
Add a custom override
Before you can add an override, you must specify the seasonality— Auto Seasonality does not support overrides.
- After picking a basic seasonality, select the Advanced button.
- Under Basic Seasonality, select Add +.
- Enter an Override Season Name.
- At least one period is required— the fields to define it appear below the Override Season Name. You can add more periods to the override by clicking Add + just above the first override period.
- For each override period in the override season, provide values for the following:
- Choose a date/time for Starts and Ends to define the period itself.
- Select how often the period repeats, and how many times it will occur.
Updated 11 months ago