
Amazon S3 bucket (Beta)
If you are interested in using this feature, please contact Lightup Support.
As this feature is currently in Beta, there are certain conditions that must be met to leverage Lightup for File Inspection:
- Lightup currently only supports parquet files
- Files must be less than 4GB in size
- Each file must contain all data relating to specific interval
Example: If the file is intended to represent hourly data, then all of the data for the hour must be in a single file, rather than spread across multiple files- The folder structure must be in a date-time-oriented, iterative naming convention (
data_subject/%Y/%m/%d/%H/file_name.parquet)
Example: purchase_data/2024/10/11/01/datapoints.parquet- Only raw parquet files are supported (no zip, gz, gzip, etc)
Lightup user setup
Lightup needs an IAM user than can access the data you want to include in the datasource. If you're running Lightup Self-hosted or Hybrid, Amazon recommends that you use an IAM role to grant permissions to applications running on Amazon EC2 instances, such as S3 datasources. To do so for your S3 datasource, follow Amazon's instructions (preceding link) to grant permissions with an IAM role. Workspace admins can then just select Managed by IAM role when they create a connection to the datasource— no other connector settings are required in this case.
Otherwise, use the following procedure to create an IAM user with an access key and a policy to enable read access, and attach the policy to the new account.
-
Create a new IAM user and an IAM access key for it, and leave Provide user access to the AWS Management Console unchecked.
IMPORTANT: To create a connection to this S3 datasource through an IAM user, workspace admins will need two strings from the IAM user's access key: the Access Key ID and the Secret Access Key— you should save a copy of them so you can provide this information as needed. -
At Step 2 - Set permissions, select Attach policies directly, then Create policy.
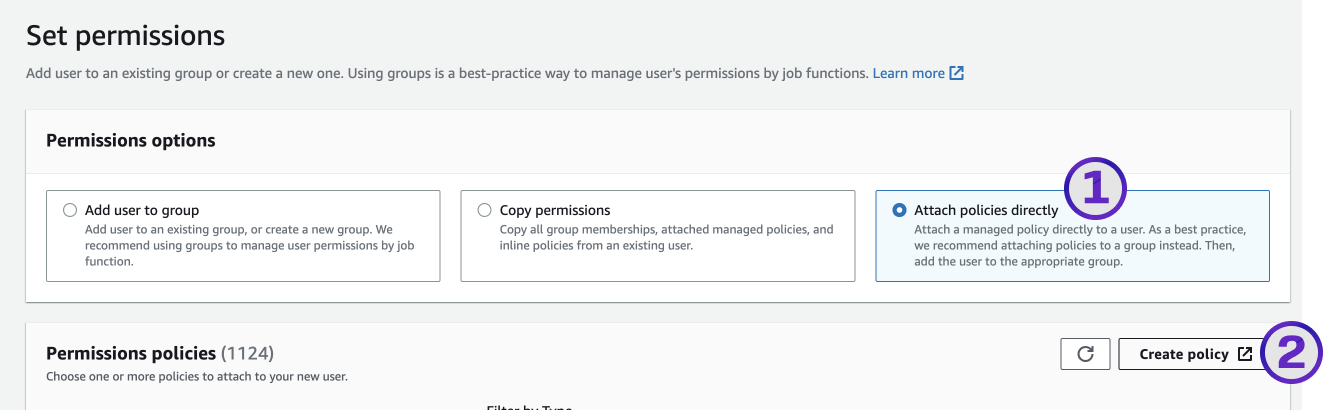
- For Policy editor, select JSON.

- Use one of the following templates to create the new policy.
- Grant access to all buckets and files:
{
	"Version": "2012-10-17",
	"Statement": [
		{
			"Effect": "Allow",
			"Action": [
				"s3:GetBucketLocation",
				"s3:ListAllMyBuckets",
				"s3:ListBucket",
				"s3:GetObject"
			],
			"Resource": "arn:aws:s3:::*"
		}
	]
}- Grant access to specific buckets (once for each bucket, replacing {bucket_name} with the actual bucket name):
{
	"Version": "2012-10-17",
	"Statement": [
        // Necessary to list buckets
		{
			"Effect": "Allow",
			"Action": [
				"s3:GetBucketLocation",
				"s3:ListAllMyBuckets"
			],
			"Resource": "arn:aws:s3:::*"
		},
		{
            // Necessary to list and retrieve files from the allowed buckets
			"Effect": "Allow",
			"Action": [
				"s3:ListBucket",
				"s3:GetObject"
			],
			"Resource": [
				"arn:aws:s3:::{bucket-name}",
				"arn:aws:s3:::{bucket-name}/*"
			]
		}
	]
}- Name the policy s3-read-only, then select Create policy.
- Back on the Create User page, refresh the policy list.
- Select the s3-read-only policy, and then select Next.
- Finish the Create User dialog.
Connect to an S3 bucket
- In the left pane, select Datasources.
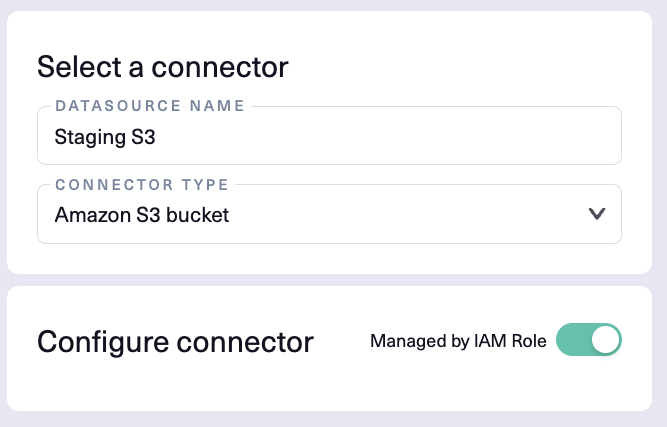
- In the main page select Create Datasource +.
- Enter a Datasource Name, then for Connector Type select Amazon S3 bucket.
- In the Configure connector section, do one of the following, based on whether there's an IAM role in place for the datasource:
- Managed by IAM Role — If an IAM Role is required for access to an S3 bucket then the IAM Role needs to be assigned to the Node/VM that Lightup is deployed on. After that is done, then the toggle switch for Managed by IAM Role to the right of Configure connector needs to be switched to the green position.
Access Keys — If there is no IAM role in place, provide the following inputs:
- Region - Specify the AWS Region where your data is hosted, e.g. "us-west-2".
- Access Key ID - Part of the access key for the lightup user. If you didn't set up the lightup user account and don't know its Access Key ID, ask your system administrator for this information.
- Secret Access Key - Part of the access key for the lightup user. If you didn't set up the lightup user account and don't know its Secret Access Key, ask your system administrator for this information.
- After entering the required settings and any optional settings that apply, below the Configure connector section select Test Connection.
- After a successful connection test, select Save.
- Your new datasource appears in the list of available datasources. By default, these are listed in alphabetical order, so you might have to scroll or change the sort order to see your new datasource.
Note that S3 datasources use virtual tables and not tables. You'll need information about the file paths used for each virtual table in order to configure them for data quality analysis.
Advanced/Schema scan frequency
You can adjust how often scans run for a datasource.
- In section 3 - Advanced, select a value for Schema scan frequency: Hourly, Daily, or Weekly.
Query Governance
S3 datasources support the Scheduling, Enable Data Storage, Maximum Backfill Duration and Maximum Distinct Values query governance settings. For steps, see Set query governance settings for a datasource.
Metadata metrics
S3 datasources currently do not support metadata metrics.
Date/time data types
These S3 date/time data types are supported:
- DATE
- TIMESTAMP
Object types
These S3 object types are supported:
Partitions
S3 datasources support partitions.
Deep metrics
S3 datasources support all deep metrics except for row by row and SQL metrics. However, the following features are not supported:
-
WHERE clauses, except for conformity metrics
-
Multiple conditions in conformity metrics
-
Full Table query scope
-
Validation of incident fixes
Updated 11 months ago